
When trying to set up Unity to compile for my Google Pixel Gen1 running Android 9, I found most articles to be either out of date, lacking depth of information, or both, and I spent quite a bit of time scratching my head trying to figure things out. Ultimately, I was having trouble configuring my compilation environment, and so I could not build for Android Devices. Let’s start from the beginning.
I started here at the Unity Tutorials Site.
Finding I needed more information, I continued on here in the Unity Manual. Trying to follow both as best I could, I encountered all sorts of problems I had to overcome.
First, I needed to install the Android SDK. Unity only requires the command line tools, so there is no need to install the full “Android Studio” suite. Awesome. Minimal Install. I got that from here.
Turns out that I needed to install Java first. Duh. I found out the hard way, that newer versions of the JDK will not work here, and when researching, I found that we can only use Veresion 8 -_-. So I opted for the most up to date version of JDK 8 (8u191) available at the time. You can get that here.
I also found out that I had to manually create an environmental variable, “JAVA_HOME” which pointed to “C:\Program Files\Java\jdk1.8.0_191”.
Upon completing installation of Java, and then the Android SDK tools, I then found out that extracting the Android SDK tools to: “C:\Program Files\Android SDK Tools” was no good, and had to put them in a subdirectory like so: “C:\Program Files\Android SDK Tools\tools”. I then had to create an environmental variable, “ANDROID_HOME” pointing towards “C:\Program Files\Android SDK Tools”
Next, I had to append the following to my Environmental Path Variable:
"C:\Program Files\Android SDK Tools\tools"
"C:\Program Files\Android SDK Tools\tools\bin"
Awesome. Now let’s download some packages! Wait, hang on… There’s no SDK Manager GUI! I guess we will have to go old school and crank out some command line. When we are done, we will have installed the packages I have listed below.

Since I had added the bin directory to my path, this should be somewhat straight forward. I opened up command prompt (as administrator) and ran the following:
sdkmanager “extras;google;usb_driver”
I was greeted with a Terms of Service, and after selling my soul to Google, I was able to install the drivers (after running as administrator the second time… duh). Now let’s install some build tools. Running the sdkmanager with the –list flag will tell us what is available for installation.
sdkmanager --list
sdkmanager "platform-tools" "platforms;android–28" "build-tools;28.0.3"
Since I am targeting my Pixel, which is up to date, I think I might as well use the up to date tools. For reference, that’s Android 9, which is API Level 28. You can find a list of Android API levels here. Let those download, and bob’s your uncle!
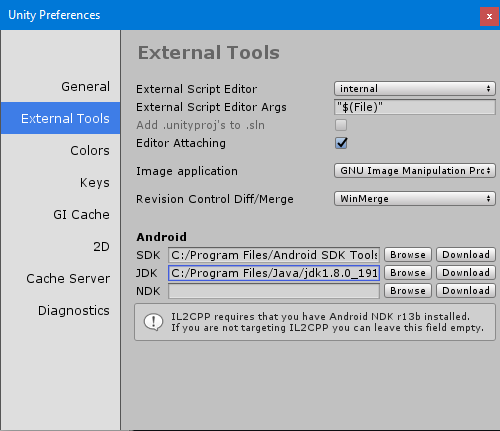
Now, I just had to open up Unity and configure my Android SDK and Java JDK paths,
Edit>Preferences>External Tools
SDK: C:/Program Files/Android SDK Tools
JDK: C:/Program Files/Java/jdk1.8.0_191
At this point, I was able to continue following the tutorials. Your mileage may differ, but I hope that I might have helped someone and saved them the time it took me to figure these few n00b problems out.